Build a Photo Gallery with Gatsby and Webiny Headless CMS
Introduction
Building Web applications has become more complicated than in previous years due to the number of tools developers are subjected to learning and working with daily. Furthermore, combining these tools with creating a functional web application can be highly taxing on developers. This is why Headless CMS platforms were created: to enable developers to build scalable backend web applications without writing any code, allowing them to concentrate on the application's front end.
In this tutorial, you’ll learn how to build a Photo Gallery with Gatsby and Webiny Headless CMS.
What is Headless CMS?
A Headless CMS is a content management system in which content is stored at the back end and made available via APIs to be displayed on the front end, allowing for greater flexibility in the information display. It enables you to manage content in a single location while still being able to deploy it across any front end you choose, as well as integrate content into any system, software, or website simply by calling the APIs exposed by the headless CMS.
Prerequisites
To follow along with this tutorial, you need to have the following:
- Basic knowledge of Svelte
- An AWS account with credentials set up on your system.
- Have Node.js version 16 and yarn installed?
Building a Photo Gallery application
Assuming the above requirements have been met, let’s get started in building out the Photo Gallery application and creating a new Gatsby application with the command below:
npm init gatsby
The above command will prompt for the name of the project. We’ll name it Gallery, preferred language (JavaScript or TypeScript), CMS, styling tools and additional features. Your selections should look like the one in the screenshot below:

Now move into the project folder and start the application on the local development server with the command below:
cd gallery npm run develop
Installing dependencies
Let’s go ahead and install the required dependencies for this project. To fetch data from our Webiny CMS, we need to install the gatsby-source-graphql package.
npm install gatsby-source-graphql
Now let’s configure Tailwindcss to style our applications. Install tailwindcss and its peer dependencies, as well as gatsby-plugin-postcss, and then run the init command to generate both tailwind.config.js and postcss.config.js files**.**
.
npm install -D tailwindcss postcss autoprefixer gatsby-plugin-postcss npx tailwindcss init -p
Then add the enable the gatsby-plugin-postcss package to the array of plugins in the gatsby-config.js file:
module.exports = { plugins: [`gatsby-plugin-postcss`], }
Next, add the configurations below to the tailwind.config.js to configure the path of the template:
module.exports = { content: [ "./src/pages/**/*.{js,jsx,ts,tsx}", "./src/components/**/*.{js,jsx,ts,tsx}", ], theme: { extend: {}, }, plugins: [], }
Now create a ./src/styles/global.css file and add the @tailwind
directives for each of Tailwind’s layers:
@tailwind base; @tailwind components; @tailwind utilities;
Then create a gatsby-browser.js file at the root of your project if it doesn’t already exist, and import your ./src/styles/global.css file.
import './src/styles/global.css'
Add a photo grid
With the Tailwindcss configured, let’s update our pages to create a photo grid UI to display all the photos the users will create in this application. Update the code in the src/pages/index.js with code snippets below:
import * as React from "react"; const IndexPage = () => { return ( <main> <div className="min-h-screen w-full flex justify-center items-center my-20 mx-0"> <div className="text-xl bg-white w-5/6 my-0 mx-auto max-w-4xl shadow-lg py-11 px-5 rounded-2xl lg:max-w-6xl lg:p-24"> <header className="flex items-center justify-center flex-col lg:flex-row lg:justify-between"> <h1 className="text-4xl font-black tracking-tighter"> PhotoGallery </h1> </header> <div className="md:grid grid-cols-3 mt-12 gap-5"> <div key="" className="w-full h-80 relative overflow-hidden rounded-lg transition-shadow duration-35 ease hover:shadow-lg" > <img src="Image" alt="" className="h-full w-full object-cover" style={{ width: "100%" }} /> <div className="w-full p-7 absolute bg-white bottom-0 text-xs"> <h2 className="font-bold"><a>Title</a></h2> <p>Description</p> </div> </div> </div> </div> </div> </main> ); }; export default IndexPage; export const Head = () => <title>Home Page</title>;
Now let’s pause and set up our Webiny CMS to store and retrieve some photos that we’ll display on our pages.
Setting Up Webiny CMS
Let's create a Webiny project with the following CLI command:
npx create-webiny-project gallery-backend
Once the installation is complete, we will deploy the Webiny project with the following command:
yarn webiny deploy
Once the deployment is completed, you'll be presented with the URL to access your Admin Area and finish the installation. Log in to your home page by providing your credentials.
Content Structure
On the home page, click the New Content Model button on the Headless CMS tab to define a photo model. Then click on the NEW MODEL button and supply the details in the screenshot below:

Then press the + CREATE MODEL button and add the fields in the screenshot below and click the save button:

In the photo model, we added a Text field for the title, Long text for the description of the photos and a Files field for the photo.
Next, go back and create another model for the Comment with the details shown in the screenshot below:

Then press the + CREATE MODEL button and add the fields in the screenshot below and click the save button:

In the Comment model, we added the Text field for the user's name and Long text for their comment. Now let’s update the photo model to reference the Comment model. To do that, add a Reference field to the photo model as shown below:

Remember to check the Use as a list reference because there will be multiple comments for a particle photo post and select Comment in the Content Models field. Now create some photo records and some comments data in the photo model and use the Webiny internal file manager
to upload the photo of the post.

Then go to the comments model and publish the comments model to remove the warnings in the comments Reference fields.
Connecting the CMS to the application
To connect the Webiny CMS to our application, we’ll need to generate an API Token to authorize our application to access the contents in our CMS. The Token can be generated in the access management section of the settings tab, found in the left navigation window of the dashboard. Fill in the form to create a new API key. In the content section, select all locales, and in the form builder dropdown, choose Custom Access. Enter the following details in the provided fields:

Now back to our application, create a .env.development file in the root directory of your project and add the TOKEN and go back to your terminal and copy the Read API into the file :
WEBINY_TOKEN = <TOKEN> WEBINY_READ_API = <CMS READ API>
Then add the configuration below to the gatsby-config.js file to load the environment variables:
require("dotenv").config({ path: `.env.${process.env.NODE_ENV}`, })
Fetch All Photos
Now that we have the credential to connect our application to the Webiny CMS, run a GraphQL query to fetch all the photos we’ve created. To get started, add the configuration below to the array of plugins in the gatsby-config.js file to connect GraphQL APIs to Gatsby’s GraphQL, which will send a request to our CMS to fetch data:
plugins: [ ... { resolve: `gatsby-source-graphql`, options: { typeName: `Webiny`, fieldName: `webiny`, url: `${process.env.WEBINY_READ_API}`, headers: { Authorization: `Bearer ${process.env.WEBINY_TOKEN}`, }, }, },
Now update the code in your pages/index.js file with the code snippets below.
import * as React from "react"; import { graphql, useStaticQuery } from "gatsby"; const IndexPage = () => { function slugify(title) { return title.toLowerCase().replace(/[^\w-]+/g, "-"); } const data = useStaticQuery(graphql` query { webiny { listPhotos { data { id title photo description comments { id name comment createdOn } } } } } `); return ( <main> <div className="min-h-screen w-full flex justify-center items-center my-20 mx-0"> <div className="text-xl bg-white w-5/6 my-0 mx-auto max-w-4xl shadow-lg py-11 px-5 rounded-2xl lg:max-w-6xl lg:p-24"> <header className="flex items-center justify-center flex-col lg:flex-row lg:justify-between"> <h1 className="text-4xl font-black tracking-tighter"> PhotoGallery </h1> </header> <div className="md:grid grid-cols-3 mt-12 gap-5"> {data.webiny.listPhotos.data.map((rec) => ( <div key={rec.id} className="w-full h-80 relative overflow-hidden rounded-lg transition-shadow duration-35 ease hover:shadow-lg" > <img src={rec.photo} alt="" className="h-full w-full object-cover" style={{ width: "100%" }} /> <div className="w-full p-7 absolute bg-white bottom-0 text-xs"> <h2 className="font-bold"> <a href={'/photo/'+ slugify(rec.title)}>{rec.title}</a> </h2> <p>{rec.description}</p> </div> </div> ))} </div> </div> </div> </main> ); }; export default IndexPage; export const Head = () => <title>Home Page</title>;
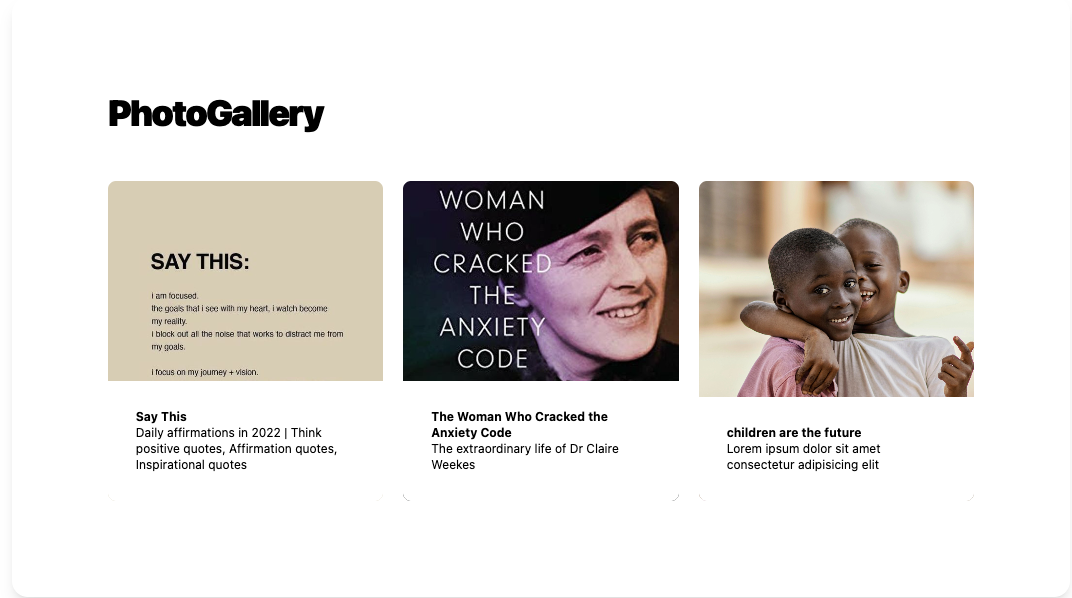
We ran a static query in the above code snippet to fetch data from our API using the Gatsby useStaticQuery hook. Then we created a slugify function to create a slug from the titles of our photo posts. This way, we can access the dynamic pages, we’ll be creating for each photo in our CMS. Then we looped through all the records and render them to the users, so if you refresh the application, you’ll see the result below:

Add a single photo view.
Now let’s create a single photo view for each photo from our API. First, create another Gatsby configuration file called gatsby-node.js and add the configurations below:
const path = require(`path`); function slugify(title) { return title.toLowerCase().replace(/[^\w-]+/g, "-"); } exports.createPages = async ({ graphql, actions }) => { const { createPage } = actions; // Query for all products in Shopify const result = await graphql(` query { webiny { listPhotos { data { title photo description comments { id name comment createdOn } } } } } `); result.data.webiny.listPhotos.data.forEach((data) => { const slug = slugify(data.title); createPage({ path: `/photo/${slug}`, component: path.resolve(`./src/templates/single.js`), context: { photo: data, }, }); }); };
In the above code snippets, we ran the same query we executed in the pages/index.js file to get all the photo data from our API. Then we Iterate over all photos and create a new page using a single.js template we’ll create shortly using the createPage extension. We also passed the photo object to the page context to access them in the pages that will be created for the photos.
Next, create the templates/single.js file in the src folder to define markup for the individual photos with the code snippet below:
import * as React from "react"; import { useState } from "react"; const PhotoSingle = ({ pageContext }) => { const { photo } = pageContext; return ( <div className="min-h-screen w-full flex justify-center items-center my-20 mx-0"> <img className="object-cover w-full rounded-t-lg h-100 md:h-auto md:w-48 md:rounded-none md:rounded-l-lg" src={photo.photo} alt="" style={{ width: "50%" }} /> <div className="flex flex-col justify-between p-4 leading-normal"> <p className="mb-3 font-normal text-gray-700 dark:text-gray-400"> {photo.description} </p> {photo.comments.map((comment) => ( <div key={comment.id} className="flex space-x-2 mb-2"> <div className="block"> <div className="bg-gray-100 w-auto rounded-xl px-2 pb-2"> <div className="font-medium"> <a href="#" className="hover:underline text-sm"> <small>{comment.name}</small> </a> </div> <div className="text-xs">{comment.comment}</div> </div> </div> </div> ))} <div className="flex"> <textarea className="" onChange={(e)=> setComment(e.target.value)}></textarea> <button type="submit" className="text-white bg-blue-700 hover:bg-blue-800 focus:ring-4 focus:ring-blue-300 font-medium rounded-lg text-sm w-full sm:w-auto px-5 py-2.5 text-center dark:bg-blue-600 dark:hover:bg-blue-700 dark:focus:ring-blue-800">Send</button> </div> </div> </div> ); }; export default PhotoSingle; export const Head = () => <title>Photo Single</title>;
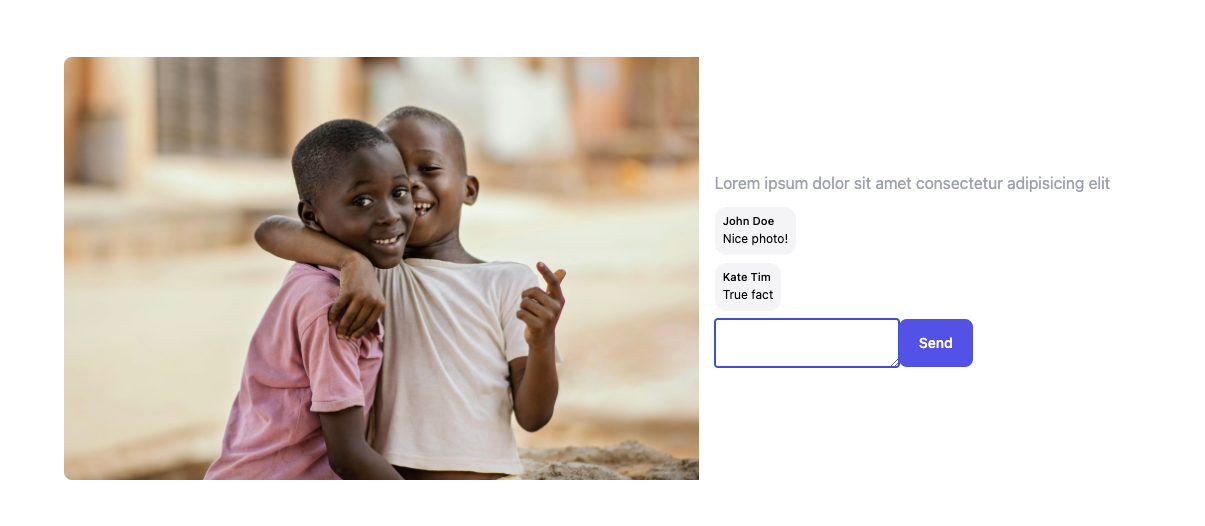
Here we destructured the photo from the pageContext to display the details of the photos. Then we iterate through the comments made on this post and display them too. Now, if you refresh the browser, you should be able to access the photo single page.

Conclusion
I'm glad you made it to this point. This tutorial taught us how to build a photo gallery with Gatsby and Webiny Headless CMS. To learn more about Webiny, visit the documentation page. The code for this tutorial is available on Github.
